app inventor mit PaintPot app code
App Objectives
- Use Canvas Components to create simple 2D drawings.
- Handling of touch and swipe events on the device screen.
- Control the display of the screen and the arrangement of components on it.
- Define variables to remember some user choices.
- Tools used in the application:
- Button tool
- Canvas Tool
- Camera tool
App Tools
Tool #1: Canvas
Palette: Drawing and Animation
Name: Canvas1
Use: decorate the application interface and cover it with a picture or color.
Tool #2: HorizontalArrangement
Palette: Layout
Name: Camera1
Use: Arrange the items on the screen in landscape orientation.
Tool #3: Camera
Palette: Media
Name: HorizontalArrangement1
Use: Recall and use the phone's camera.
Steps
1. Create a new app in the App Inventor, and give it the name "PaintPot".
2. Select Screen1 in the component palette, then change its Title property to PaintPlt.
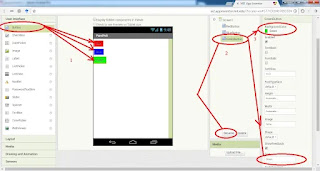
3. Add three buttons from the User Interface panel on the screen, one of which is red, another green, and the last blue, and set the properties of the buttons as follows:
2. Drag the HorizontalArrangement tool from the Layout panel to the screen, then set its Width property to Fill Pattern to fill the Horizontal Arrangement tool with the width of the screen.
3. Then, drag the three buttons and drop them inside the horizontal arrangement tool, so that it becomes as follows.
4. Adjust the alignment of the buttons in the center of the screen by setting the (AlignHorizontal) property to (Center).
Adding a Canvas
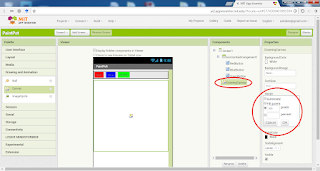
1. Add the Canvas component to the User Interface panel on the screen.
2. Set the Fill pattern property of this tool to (300 pixels) so that the length of this tool will be 300 points below the row of buttons.
3. Download the image of the cat from this link.
4. Change the BackgroundImage property of the DrawingCanvas component of the cat's image, by pressing the (Upload File) button and selecting the image file that was previously downloaded to your computer, so that the cat's image then covers the decorating board.
5. Set the PaintColor property of the DrawingCanvas component to red.
Adding and Arranging the Bottom Buttons and the Camera Component
1. Drag another HorizontalArrangement tool from the Layout panel to the screen at the bottom of the Canvas, then set its Width property to Fill Pattern to fill the Horizontal Arrangement tool with the width of the screen.
2. Add four new buttons inside the new horizontal arrangement panel, and set their properties as follows:
Button #1- Name: TakePictureButton
- Text: Take Picture
- Name: WipeButton
- Text: Wipe
- Name: BigButton
- Text: Big Dots
- Name: SmallButton
- Text: Small Dots
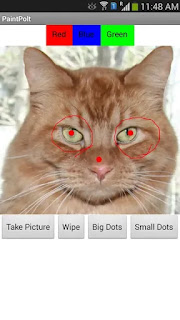
3. Drag the Camera component from the Media panel to the screen, and the design of the application components is completed, as shown in the following figure.
Adding behaviors to the components
After we have added and designed the application components and their arrangement on the screen, in this step we will adjust the behaviors of the components (behaviors) to respond to events (events) while the application is running. You can draw when you drag on the application screen with your finger, change colors when you click the color buttons, change the point size when you press the size buttons, take a new picture when you press the camera button, and draw on it.
Add a touch event to draw dots
We will first activate the click event on the screen to draw dots in the default red color, to do this we follow the following:
1. Click the (Blocks) button on the top left to go to the blocks screen, through which we will set the functions of the tools and customize their events without writing code.
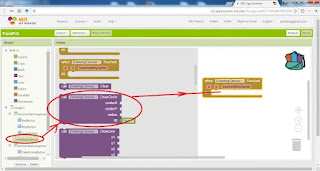
2. Click on a component (DrawingCanvas) from the bottom left of the screen, then drag a block (DrawingCanvas.Touched) to the area of the block.
This block is intended to respond to a screen tap event in the dashboard area covered with a cat image.
3. Click the (DrawingCanvas) component again, and then drag the DrawingCanvas.DrawCircle event call block onto the DrawingCanvas.DrawCircle decorator to the area of the block inside the previous block.
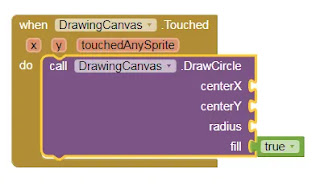
app blocks well are like that:
This tells the app to draw circles when the screen is tapped, according to the length (CenterX) and width (CenterY) coordinates of the screen, according to the radius to be selected, and the circle is filled (fill.true) with the default color.
Now we have to specify the values of these variables by dragging the block of the variable (get) from the category of variables (Variables) in the block panel, and changing its value from its arrow so that the block is as in the following figure, and we also drag the block of a number from the arithmetic category (Math) and paste it at the block Diameter (Radius), and set its value to (5).
App Blocks
App Preview
1. Choose Al companion command from the Connect menu.
2. Point the phone's camera at the code that will appear on the screen, and press the (Scan QR code) button to launch the application on the phone.
3. Click in separate places on the cat's image to show red circles in the places where you clicked.
Add a drag event to draw lines
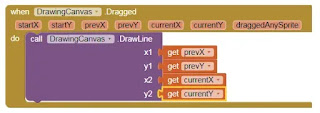
We will now activate the drag event on the screen to draw the lines in the default red color, to do this we follow the following:1- Click the (Blocks) button on the top left to go to the blocks screen, then click on the (DrawingCanvas) component, and drag the drag event on the decorating panel (DrawingCanvas.Dragged) to the area of the block.
2- Click on the (DrawingCanvas) component again, then drag the DrawingCanvas.DrawLine event call block onto the DrawingCanvas.DrawLine decorator to the area of the block inside the previous block.
This event tells the app to draw lines when swiping on the screen, according to the current swipe coordinates on the screen in the default color.
3- Now we have to determine the values of these variables by dragging the variable block from the Variables category in the block panel, and changing its value from its arrow, so that the block is as shown in the following figure.
App Preview
1. Choose Al companion command from the Connect menu.
2. Point the phone's camera at the code that will appear on the screen, and press the (Scan QR code) button to launch the application on the phone.
3. Click in separate places on the cat's image to show red circles in the places where you clicked.
4. Drag on the image to draw lines on it.


