In the first part of the PaintPolt app tutorial in mit appinventor, we saw how we can draw dots and lines on the image using the default color red, which is previously specified in the PaintColor property of the DrawingCanavas.
app inventor mit PaintPot app Upgrade
App Objectives
- Using event handlers that take arguments.
- Defining variables to remember things like the dot size the user has chosen for drawing.
Change the colors of the drawing
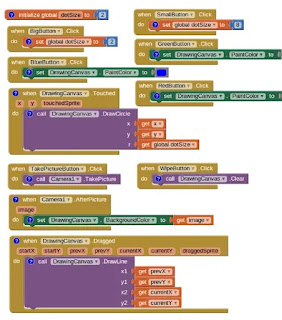
We can change the default color in any of the colors (blue, green, red) by activating the action of the color buttons at the top of the application, by setting their click events. To do this we do the following:
1. Click on the button component (RedButton) at the bottom of the screen in the blocks panel, and drag the button click event (When RedButton.Click) to the area of the block.
2. Click a component (DrawingCanvas) in the blocks panel, then drag the (DrawingCanvas.PaintColor) event to be inside the button click event.
3. Drag the red color from the Colors category and place it at the end of the DrawingCanvas.PaintColor block.
Repeat with the other two buttons, to set the most recent click on the green button and the blue button.
Add coloring erase event
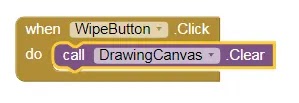
To erase the coloring that was done on the image, we must activate the click event of the (WipButton), this is done by following the following steps:
1. Click on the button component (WipButton) at the bottom of the screen in the blocks panel, and drag the button click event (When WipButton.Click) to the block area.
2. Click a component (DrawingCanvas) in the blocks pane and then drag the DrawingCanvas.Clear event into the button clicks event.
App Preview
1. Choose Al companion command from the Connect menu.
2. Point the phone's camera at the code that will appear on the screen, and press the (Scan QR code) button to launch the application on the phone.
3. Click in separate places on the cat's image to show red circles in the places where you clicked.
4. Change the default color by pressing the blue or green button.
5. Keep clicking and dragging to draw on the image
6. Click the Wipe button to erase the coloring on the image.
Change the size of the drawing points
So far, dots are drawn on the image with one size, and we can activate the click events of the Big Dots and Small Dots buttons to draw on the image with different point sizes. To do this we do the following:1. At first we add a global variable in the application that saves the dotSize value and we set the default value of this variable to (2).
2. Go to the Variables category in the blocks panel, then drag the initialize global block to the area of the block.
3. We change the name of the variable to (dotSize) as in the following figure, and we withdraw an empty arithmetic value block and enter the value (2).
4. Now we have to change the default value of the diameter of the circle (radius) to which the value (5) was previously set. We delete the value (5) by clicking on it and then pressing the (Delete) button on the keyboard, or by dragging it to the trash in the blockwork area.
5. We pull the variable (get) from the category of variables (variable) in the block panel, and assign it the value (global dotSize).
Change the value of drawing points
The default point size is the value (2) set in the global dotSize variable.
The size of the points is changed by activating the event of pressing the large dots button after changing it to (8), and the event of pressing the small dots button to return to the value (2). To do this we do the following:
1. Click on the BigButton component at the bottom of the screen in the Blocks panel, and drag the When BigButton.Click event to the Blocks area.
2. Go to the Variables category in the Blocks panel, then drag a block (set .to) into the When BigButton.Click event.
3. Change the variable name to (global dotSize) as shown in the following figure, and drag an empty arithmetic value block to it, and enter the value (8).
4. Click on the button event (When BigButton.Click) and choose the command (Duplicate) to be repeated, then change its name to (SmallButton), and change the value of the global variable to become the size of the point (2).
App Preview
1. Choose Al companion command from the Connect menu.2. Point the phone's camera at the code that will appear on the screen, and press the (Scan QR code) button to launch the application on the phone.
3. Click in separate places on the cat's image to show red circles in the places where you clicked.
4. Change the default color by pressing the blue or green button.
5. Keep clicking and dragging to draw on the image.
6. Click the (Wipe) button to erase the coloring from the image.
7. Click the (Big Dots) button and draw again on the image to be painted with large dots.
8. Click the (Small Dots) button and draw again on the image to be painted with small dots.
Enable the user to take pictures
So far, the application works on a single image, the image of the cat selected from the design steps, which is the background of the canvas.
This photo can be changed to a photo taken with a smartphone camera. To do this we do the event of pressing the (Tack Picture) button. This is done as follows:
1. Click on the TakePictureButton component at the bottom of the screen in the blocks panel, and drag the button click event (When TakePicture.Click) to the area of the block.
2. Click on the Camera item in the blocks panel, then drag a block (call Camera1.TakePicture) into the When TakePicture.Click event.
3. Click on the Camera item in the blocks palette again, then drag the (Camera1.AfterPicture) block into the blocks working area.
4. Click on the DrawingCanvas component in the Blocks Palette, then drag the DrawingCanvas.BackgroundImage into the Camera1.AfterPicture event.
5. Drag an empty get block from the list of variable blocks and place it at the end of the previous event, and change its value to (image).
This event changes the background image of the DrawingCanvas component of the image captured from the camera.
App Preview
1. Choose Al companion command from the Connect menu.
2. Point the phone's camera at the code that will appear on the screen, and press the (Scan QR code) button to launch the application on the phone.
3. Click in separate places on the cat's image to show red circles in the places where you clicked.
4. Click the (Tack Picture) button to run the default camera program on the smartphone, take the desired picture with it to appear inside the application instead of the default cat picture.
5. Use the different buttons given in the app to draw on the captured image.


